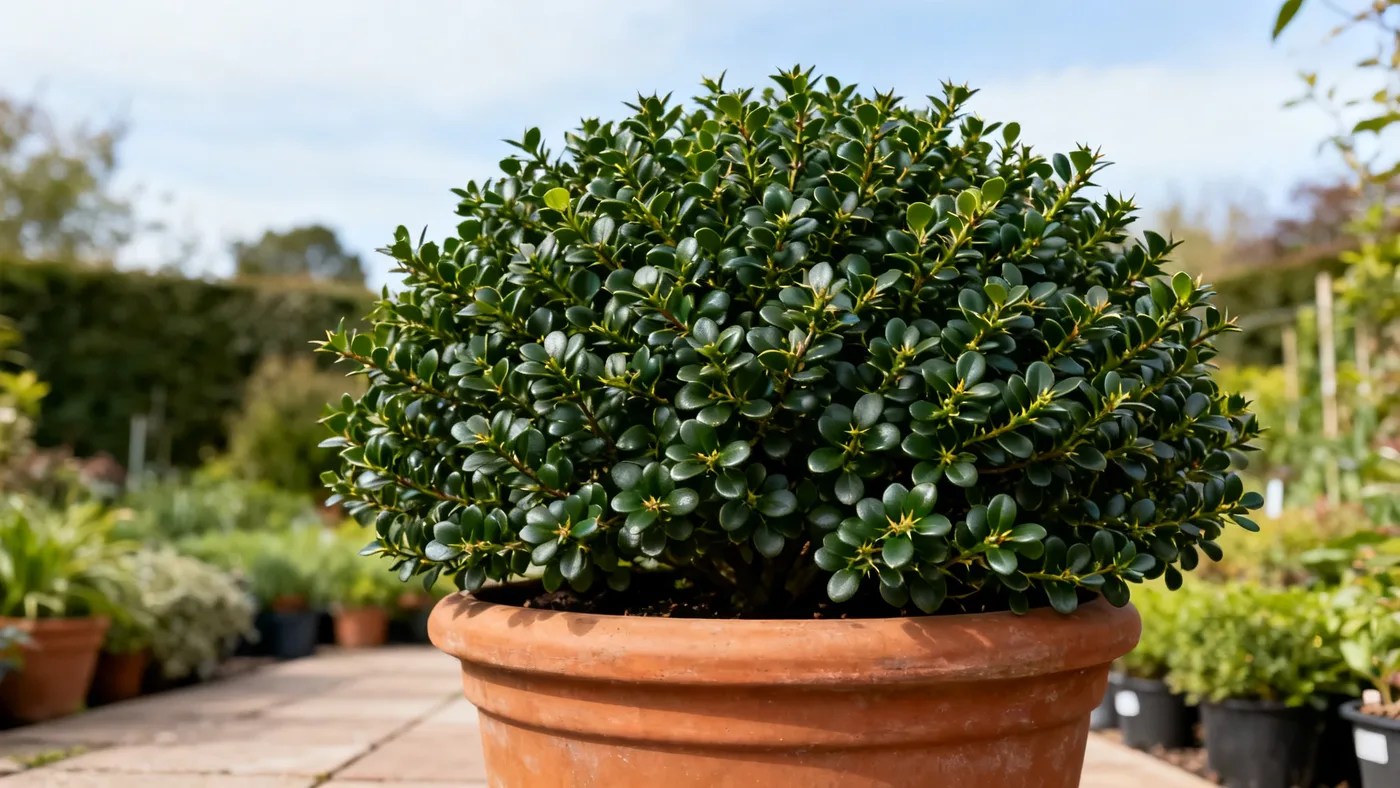
Growing Soft Touch Japanese Holly in Containers and Pots
Soft Touch Japanese Holly thrives in containers, making it an excellent choice for patios, decks, and entryways where in-ground planting isn't an option. Because this cultivar grows slowly (roughly 3 to 6 inches per year) and matures to just 2 to 3 feet tall, it fits naturally into container schemes. The key is matching the pot to the plant's needs and managing moisture through the seasons, especially in colder zones.
Why Container Growing Works for Soft Touch Holly
This shrub tolerates container life because it requires consistent moisture and well-drained soil, conditions you can control precisely in a pot. Its fine-textured, dark green foliage stays dense year-round, so container specimens maintain their mounded shape without aggressive pruning. The slow growth rate means you won't need to upsize pots frequently, and the modest mature size means one specimen won't outgrow a typical patio scale.
Container growing also lets you adjust light and microclimate. In hot climates, you can move the pot to part shade, where Soft Touch Holly achieves the best foliage density.
Materials and Setup You'll Need
- A pot at least 12 to 15 inches in diameter for an established plant, or slightly larger (16 to 18 inches) if you want room for a few years of growth
- Drainage holes in the bottom (non-negotiable for preventing root rot)
- Potting soil formulated for shrubs or evergreens, or a homemade blend of peat moss, pine bark, and perlite in roughly equal parts
- Soil pH test kit (optional but helpful, since the plant prefers acidic to slightly acidic soil, roughly 5.0 to 6.5 pH)
- Slow-release, acid-forming shrub or holly fertilizer (a 1 to 2 ounce application spread over early spring)
- A saucer or tray if the pot sits on wood or stone that you want to protect from water stains
- Mulch (optional: a thin layer of pine bark around the base, kept 1 to 2 inches away from the stem)
Planting and Initial Setup: Step-by-Step
Step 1: Choose the Right Pot
A 12 to 15-inch-diameter pot works well for most Soft Touch Holly specimens, whether you start with a quart, number-one, or number-three container from a nursery. The pot should have at least one drainage hole, ideally more. Terracotta is ideal because it breathes and prevents soil from staying waterlogged, but plastic also works if the drainage is reliable.
Step 2: Prepare Potting Mix
Fill the pot about one-third full with potting soil. If you're making your own blend, combine equal parts peat moss, pine bark, and perlite to ensure good drainage while retaining moisture. Avoid standard garden soil, which compacts in pots and restricts root growth. The plant needs soil that is moist, well-drained, and humus-rich.
Step 3: Plant at the Right Depth
Remove the holly from its nursery container and gently loosen the root ball with your fingers. Set it in the pot so the top of the root ball is level with the soil surface, not buried. The stem should never be covered with soil, as this invites root rot. Backfill around the sides with potting mix, firming gently as you go.
Step 4: Water Thoroughly
Water the pot until water drains freely from the bottom. This settles the soil and eliminates air pockets around the roots. The first watering is critical, it ensures full contact between roots and potting medium.
Step 5: Place in the Right Light
Set the pot in full sun to part shade. In cooler zones (5 to 7), full sun helps the plant establish quickly. In zone 8 or warmer, part shade produces the densest foliage and protects the plant during scorching afternoon heat. Avoid deep shade, which leads to sparse growth.
Year-Round Container Care
Watering Schedule
Soft Touch Holly is not drought tolerant, so consistent moisture is essential. During the growing season (spring and early summer), water when the top inch of soil feels dry to the touch. This typically means watering once or twice a week, depending on pot size, ambient temperature, and humidity. In fall and winter, reduce frequency but never let the soil dry out completely, especially in zone 5 to 7 where hard freezes can damage dry roots.
Containerized plants dry faster than in-ground specimens because roots are exposed to air on all sides. Monitor regularly, particularly on windy days or during heat spells, when moisture evaporates quickly.
Feeding Your Container Holly
Apply a light annual feeding in early spring with an acid-forming, slow-release shrub or holly fertilizer. Follow the package rate, typically 1 to 2 ounces per pot of this size. Avoid over-fertilizing, which leads to soft, weak growth and can burn roots in the confined potting medium. Once yearly feeding is enough; twice would be excessive.
Pruning in Containers
Soft Touch Holly has a naturally mounding shape and requires minimal pruning. If you want to maintain a tidy appearance or control size, light shearing in late winter or early spring before new growth emerges works well. Alternatively, prune lightly after the main flush of growth in early summer. A few passes with hedge shears keep the plant compact without setting you back.
Winter Protection in Colder Zones
The plant is rated for zones 5 to 8. In zones 5 to 6, winter protection is prudent for containerized plants, since roots in pots are more exposed to freezing than in-ground roots. Move the pot against a south-facing wall or garage, or wrap the pot loosely in burlap to insulate it. Water once before the ground freezes hard so roots aren't dry going into winter. In zones 7 to 8, winter protection is usually unnecessary unless an exceptionally harsh freeze is forecast.
Monitoring for Pests and Problems
Containerized hollies can develop scale insects, spider mites, or leaf miners. Scale appears as small bumps on stems and foliage, spider mites cause stippling and fine webbing, and leaf miners create winding tunnels in leaves. If you spot any of these, spray with horticultural oil or insecticidal soap, following label directions.
Root rot and black root rot are the most serious threats in containers. Both result from overwatering or poor drainage. If soil stays soggy, roots decay and foliage yellows or browns. The best prevention is a pot with drainage holes and soil that drains within a few minutes of watering. If root rot develops, carefully repot into fresh potting mix and reduce watering frequency.
Chlorosis (yellowing leaves with green veins) indicates alkaline soil. If this occurs, check your soil pH and amend with sulfur or use an acid-forming fertilizer in future feedings to lower the pH toward the plant's preference of 5.0 to 6.5.
Tips for Success
- Refresh the top inch or two of potting soil each spring by gently scraping away old soil and replacing it with fresh mix. This replenishes nutrients and improves drainage over time.
- Group containers together on a patio or deck to create a microclimate with slightly higher humidity, which the plant prefers.
- Use a saucer beneath the pot to catch excess water, but never let the pot sit in standing water, which encourages root rot.
- In zones 5 and 6, moving the pot into an unheated garage or against a sheltered wall before the coldest weather provides insurance against winter leaf burn, which can occur in exposed sites.
- If foliage looks pale or sparse, it's likely a sign of poor drainage or insufficient light, not a nutrient deficiency. Improve drainage or move the pot to a brighter spot before adding fertilizer.
Common Mistakes to Avoid
- Choosing a pot that's too large. An oversized pot holds excess moisture and increases the risk of root rot. A 12 to 15-inch pot is ample for most specimens; you can upsize after a few years if needed.
- Using regular garden soil instead of potting mix. Garden soil compacts in containers and stays too wet, suffocating roots.
- Overwatering. While Soft Touch Holly prefers consistent moisture, it's not a bog plant. Water when the top inch of soil is dry, not on a fixed schedule.
- Planting too deep. Burying the stem invites rot. The top of the root ball should be level with the soil surface.
- Neglecting winter care in cold zones. A pot exposed to wind and freeze cycles can damage even a hardy plant. Give it shelter.
- Applying too much fertilizer. Slow growth and a small container mean the plant needs only light feeding once per year. Excess fertilizer salts damage roots.
Expected Results and Timeline
In the first season, the plant may focus on root establishment rather than visible top growth; this is normal. By year two, you should see steady slow growth (roughly 3 to 6 inches per year) and increasingly dense foliage. A well-maintained container specimen may take 3 to 5 years to reach a full, mounded form, but it will stay tidy and proportional throughout.
For landscaping inspiration, check our guide on landscape ideas for Soft Touch Japanese Holly, which includes container and mixed-border schemes. For comprehensive year-round care, see our complete care guide.
Quick Reference: Container Care Checklist
| Task | Timing | Details |
|---|---|---|
| Planting | Spring or fall | 12 to 15-inch pot, potting mix, drain holes, top of root ball level with soil surface |
| Watering | Growing season (spring, early summer) | Water when top inch of soil is dry; reduce in fall and winter but never dry out completely |
| Winter water | Before ground freeze (late fall, zone 5-7) | One deep watering to ensure roots are moist going into dormancy |
| Fertilizing | Early spring | Light application of acid-forming shrub or holly fertilizer; once yearly |
| Pruning | Late winter or early summer | Light shearing only; minimal pruning needed to maintain mounded shape |
| Winter protection | Before hardest freezes (zone 5-6) | Move to sheltered location or wrap pot loosely in burlap |
| Repot or refresh soil | Every 2 to 3 years or as needed | Refresh top inch of soil annually; upsize pot only if root-bound |
| Pest and disease check | Monthly during growing season | Scout for scale, spider mites, leaf miners, or signs of root rot (yellow foliage, soggy soil) |